SAP C_S43인기자격증덤프공부문제 - C_S43최고덤프
Wiki Article
Itcertkr 는 완전히 여러분이 인증시험 준비와 안전한 시험패스를 위한 완벽한 덤프제공 사이트입니다.우리 Itcertkr의 덤프들은 응시자에 따라 ,시험 ,시험방법에 따라 알 맞춤한 퍼펙트한 자료입니다.여러분은 Itcertkr의 알맞춤 덤프들로 아주 간단하고 편하게 인증시험을 패스할 수 있습니다.많은 C_S43인증관연 응시자들은 우리 Itcertkr가 제공하는C_S43 문제와 답으로 되어있는 덤프로 자격증을 취득하셨습니다.우리 Itcertkr 또한 업계에서 아주 좋은 이미지를 가지고 있습니다.
Itcertkr는 한국어로 온라인상담과 메일상담을 받습니다. SAP C_S43덤프구매후 일년동안 무료업데이트서비스를 제공해드리며SAP C_S43시험에서 떨어지는 경우SAP C_S43덤프비용 전액을 환불해드려 고객님의 부담을 덜어드립니다. 더는 고민고민 하지마시고 덤프 받아가세요.
최신 C_S43인기자격증 덤프공부문제 인증시험대비자료
IT인증시험은 국제적으로 인정받는 자격증을 취득하는 과정이라 난이도가 아주 높습니다. SAP인증 C_S43시험은 IT인증자격증을 취득하는 시험과목입니다.어떻게 하면 난이도가 높아 도전할 자신이 없는 자격증을 한방에 취득할수 있을가요? 그 답은Itcertkr에서 찾을볼수 있습니다. Itcertkr에서는 모든 IT인증시험에 대비한 고품질 시험공부가이드를 제공해드립니다. Itcertkr에서 연구제작한 SAP인증 C_S43덤프로SAP인증 C_S43시험을 준비해보세요. 시험패스가 한결 편해집니다.
최신 SAP Certified Application Associate C_S43 무료샘플문제 (Q11-Q16):
질문 # 11
Task: 5
Configure and create a Maintenance Notification
The project team evaluates during the implementation project the Maintenance Notifications in SAP S
/4HANA Asset Management. The following features need to be checked:
* Configure and create a Maintenance Notification
* Assign catalog specific data to a Maintenance Notification
* Create a Maintenance Notification and save it. Use the following information: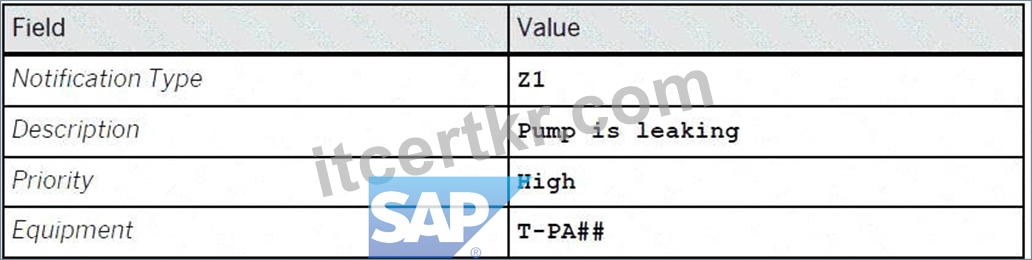
* Assign the following data to the just created notification: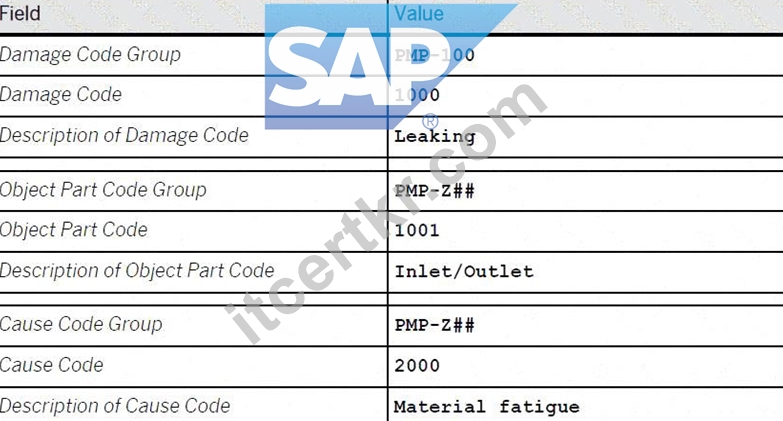
정답:
설명:
See the Explanation for complete Solution of this Task.
Explanation:
Task 5 Overview
The project team is evaluating Maintenance Notifications in SAP S/4HANA Asset Management. This task involves creating a notification and assigning catalog-specific data to it.
Step 1: Create the Maintenance Notification
In this step, you will record a technical problem in the system.
* Access the Transaction : Use transaction code IW21 (Create Maintenance Notification) in the SAP GUI or the corresponding Fiori app.
* Initial Screen :
* Notification Type : Enter Z1 .
* Press Enter .
* Enter General Data :
* Description : Enter Pump is leaking .
* Priority : Select High .
* Equipment : Enter T-PA48 .
* Save : Click the Save (floppy disk) icon to generate a notification number.
Explanation : Creating a notification is the first step in the maintenance process. It documents the "what" (leaking pump), the "how critical" (high priority), and the "where" (Equipment T-PA48).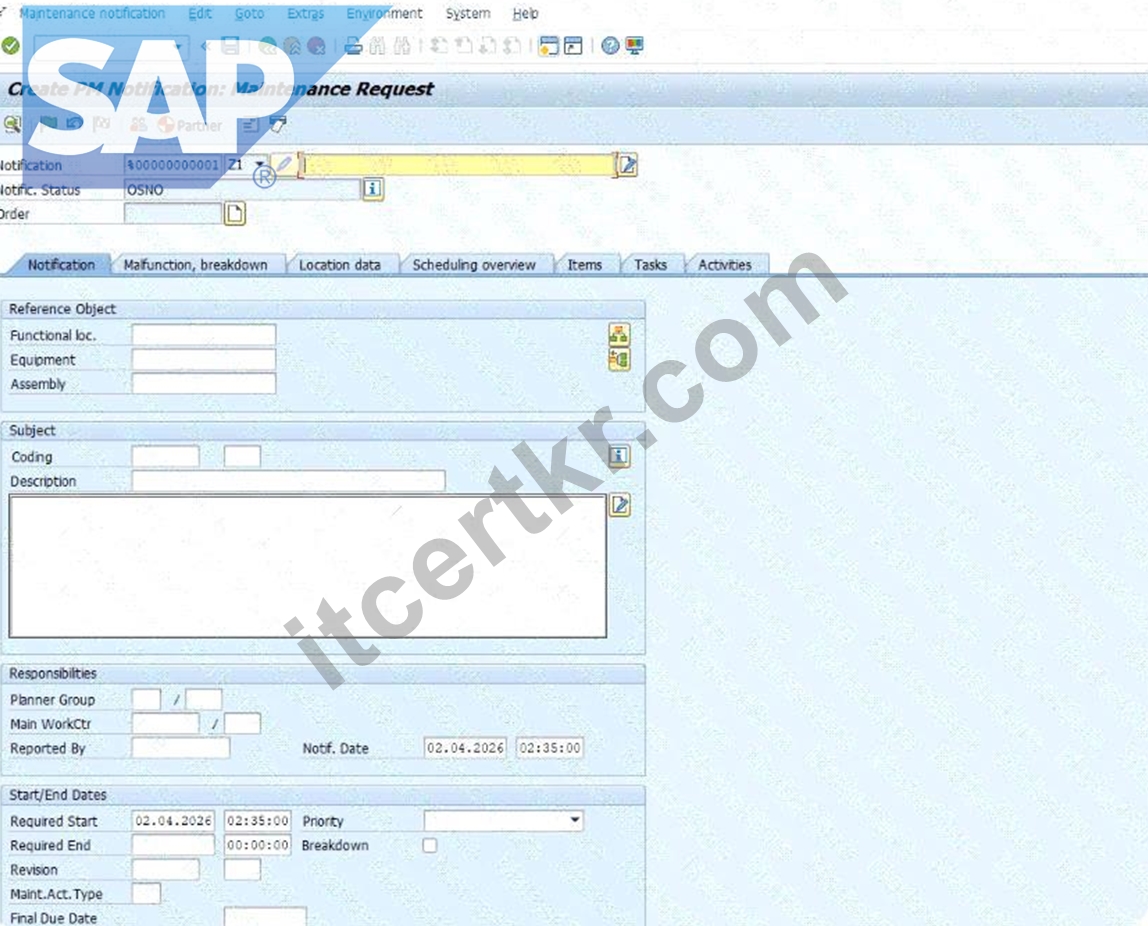
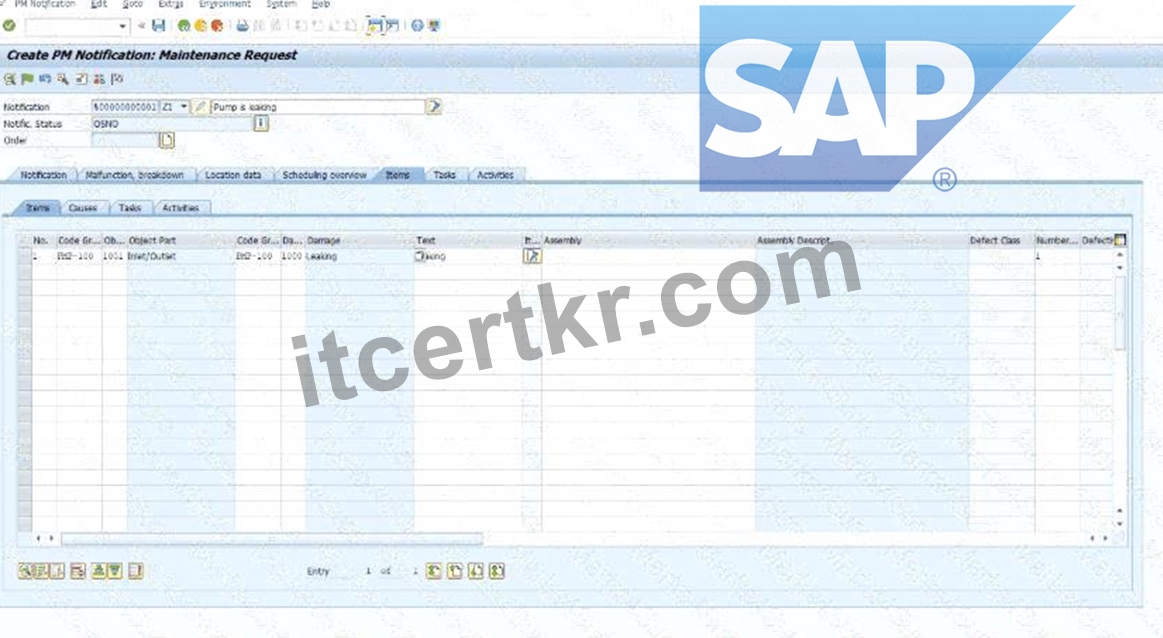
Step 2: Assign Catalog Specific Data
Now you must assign technical codes to describe the damage precisely for future reporting and analysis.
* Access the Transaction : Use transaction code IW22 (Change Maintenance Notification) to open your recently created notification.
* Navigate to Item Data : Go to the Items tab or the relevant section for damage and causes.
* Enter Damage Details :
* Damage Code Group : PMP-100 .
* Damage Code : 1000 .
* Description : Leaking .
* Enter Object Part Details :
* Object Part Code Group : PMP-Z48 .
* Object Part Code : 1001 .
* Description : Inlet/Outlet .
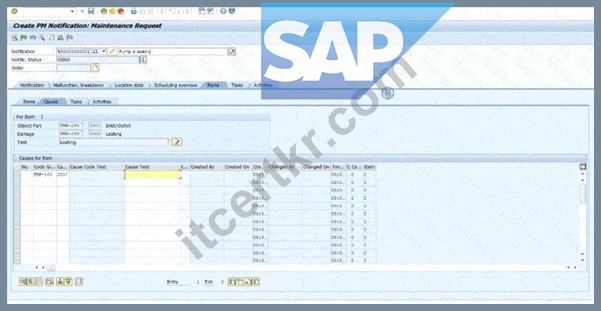
* Enter Cause Details :
* Cause Code Group : PMP-248 .
* Cause Code : 2000 .
* Description : Material fatigue .
* Save : Click the Save icon to finalize the notification.
Explanation : Assigning catalog data categorizes the issue using standardized codes. This allows the company to run "Bad Actor" reports later to see, for example, how many pumps are failing due to "Material fatigue" versus "Operator error".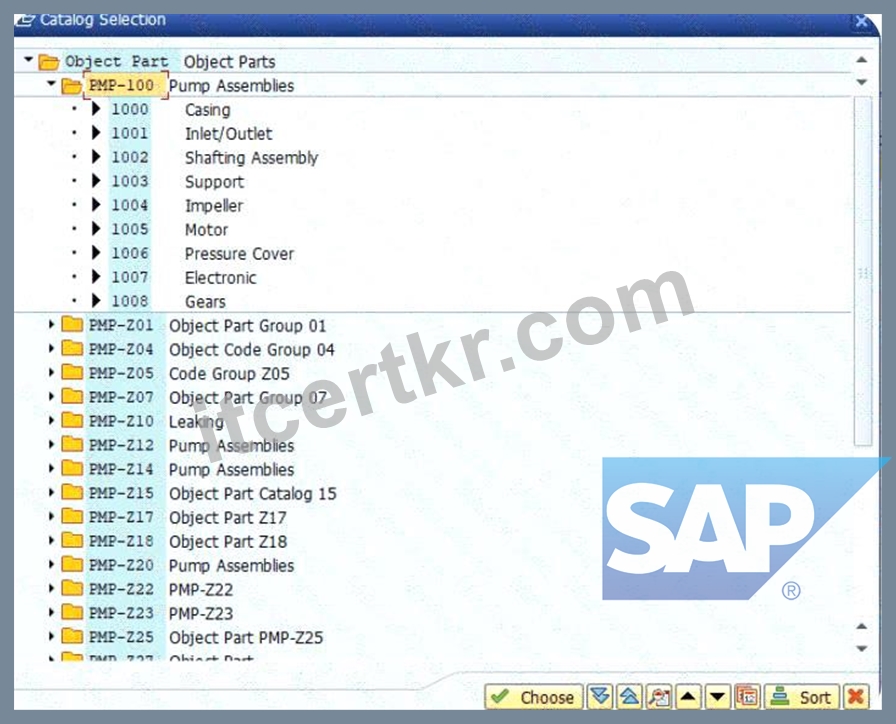
질문 # 12
Use Phase-Based Maintenance Processing
The project team evaluates during the implementation project Phase-Based Maintenance Processing in SAP S
/4HANA Asset Management. The following features need to be checked:
* Initiate and screen a Maintenance Notification
* Plan Maintenance Order and send it for approval
* Create a Maintenance Notification using an already available notification type which is suitable for phase-based maintenance and save it.
Use the following data: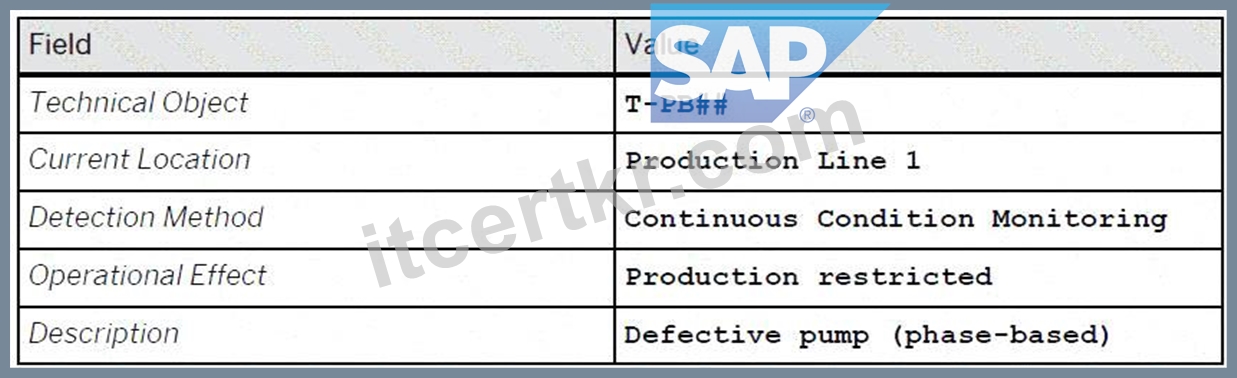
* Screen and accept the just created Maintenance Notification.
* Create an Order (Phase-based) for your accepted notification and submit it for approval.
Use the following data:
정답:
설명:
See the Explanation for complete Solution of this Task.
Explanation:
Task 10 Overview
This task evaluates your ability to manage the newer, phase-led maintenance workflow in SAP S/4HANA.
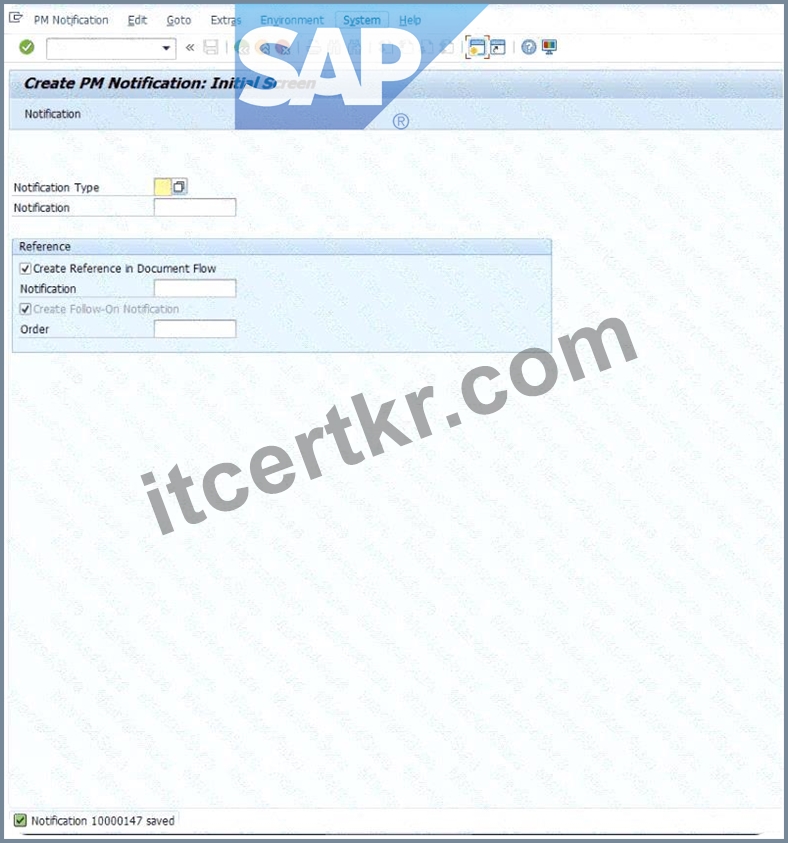
Unlike the traditional "emergency" repair you did earlier, this process includes formal screening and approval steps Step 1: Create a Phase-Based Maintenance Notification In this step, you initiate the request.
* Access the Transaction : Use transaction IW21 or the Fiori app Create Maintenance Request .
* Select Notification Type : Use a type configured for phase-based maintenance (typically Y1 - Maintenance Request ).
* Enter the Following Data :
* Technical Object : T-PB48
* Description : Defective pump (phase-based)
* Current Location : Production Line 1
* Detection Method : Continuous Condition Monitoring
* Operational Effect : Production restricted
* Save : Note the notification number generated.
Explanation : This step "initiates" the maintenance process. In phase-based maintenance, the notification starts in the Initiation phase, where it must be reviewed before any work is planned.
Step 2: Screen and Accept the Notification
As a "Maintenance Coordinator," you must now review the request.
* Access the Fiori App : Open Screen Maintenance Requests .
* Locate Your Notification : Find the notification you just created for T-PB48.
* Perform Screening :
* Review the details to ensure they are complete.
* Click Accept to move it to the next phase.
Explanation : "Screening" is a quality gate. It ensures that the maintenance team only spends time planning valid, well-described issues. Once accepted, the notification moves from the Initiation phase to the Screening phase and finally becomes available for planning.
Step 3: Create and Plan the Phase-Based Order
Now you will create the formal work order for the accepted request.
* Create Order : From within the accepted notification, or using the Manage Maintenance Backlog app, choose to Create Order .
* Enter Planning Data :
* Technical Object : T-PB48
* Operation 0010 Description : Repair damage
* Operation 0010 Work : 2 h
* Submit for Approval : Look for the Submit for Approval button at the top of the order screen.
Explanation : This step moves the order into the Planning phase. By submitting it for approval, you are requesting the budget and resources to perform the work. The order status will change to indicate it is
"Waiting for Approval"
질문 # 13
Schedule a Maintenance Plan
The project team evaluates during the implementation project the scheduling of Maintenance Plans in SAP S
/4HANA Asset Management. The following features need to be checked:
Schedule a Maintenance Plan
Display a generated Maintenance Order
Schedule the previously created Maintenance Plan. The following prerequisites have to be met:
The next upcoming call is the 4 MON Maintenance Package
Calculate the Completion Date of the last Maintenance Package as follows: Today's date minus 4 weeks (e.g.
today's date: 15th of December > > > Completion Date: 17th of November) The Call Date is always 10 days before the Plan Date.
Note:
Check your Maintenance Plan and adapt it, if necessary, before you schedule it.
Check the following information in the generated Maintenance Order:
number of order operations: 2
Maintenance Plan: number of the previously created Maintenance Plan
Last Included Task List: A / TL-## / 1
정답:
설명:
See the Explanation for complete Solution of this Task.
Explanation:
Task 9 Overview
The goal of this task is to trigger the maintenance schedule you built in Task 8 so that the system generates an actual work order. You must meet specific scheduling conditions to ensure the right maintenance cycle (the 4- month package) is triggered.
Step 1: Adapt Scheduling Parameters (IP02)
Before starting the schedule, you must ensure the "Call Date" rules are correct.
* Transaction : Enter IP02 (Change Maintenance Plan).
* Maintenance Plan : Enter the number you saved in Task 8 and press Enter .
* Scheduling Parameters Tab :
* Call Horizon : Adjust this so that the Call Date occurs exactly 10 days before the Plan Date.
* Note: If your system uses percentages, you will need to calculate the percentage of the 4-month cycle that results in a 10-day lead time.
* Save your changes.
Step 2: Schedule the Plan (IP10)
Now you will "start" the clock for this maintenance schedule.
* Transaction : Enter IP10 (Schedule Maintenance Plan).
* Maintenance Plan : Enter your plan number and press Enter .
* Start Scheduling : Click the Start icon (or go to Maintenance plan > Scheduling > Start ).
* Enter the "Start Date" / "Completion Date" :
* The Rule : You must use Today's date minus 4 weeks .
* Example: If today is April 19, enter March 22.
* Press Enter . The system will calculate the next calls.
* Verify the Package : Ensure the next upcoming call is indeed the 4 MON (4-month) Maintenance Package.
* Save (Floppy Disk icon). This will generate a new Maintenance Order number.
Step 3: Verify the Generated Maintenance Order
You must now check that the order was created correctly based on the rules of your Task List (Task 7) and Maintenance Plan (Task 8).
* Display Order : In IP10 , select the line for the generated call and click the Display Order icon (or use transaction IW33 with the new order number).
* Check the following three items :
* Operations : Verify there are exactly 2 operations in the order (the Monthly and 4-Month tasks).
* Maintenance Plan : Confirm the order shows your specific Maintenance Plan number.
* Task List : Verify the "Last Included Task List" is A / TL-48 / 1 .
질문 # 14
Create a Maintenance Plan
The project team evaluates during the implementation project Maintenance Plans in SAP S/4HANA Asset Management. The following features need to be checked:
Create a Maintenance Plan
Create a Maintenance Plan and save it. Use the following information: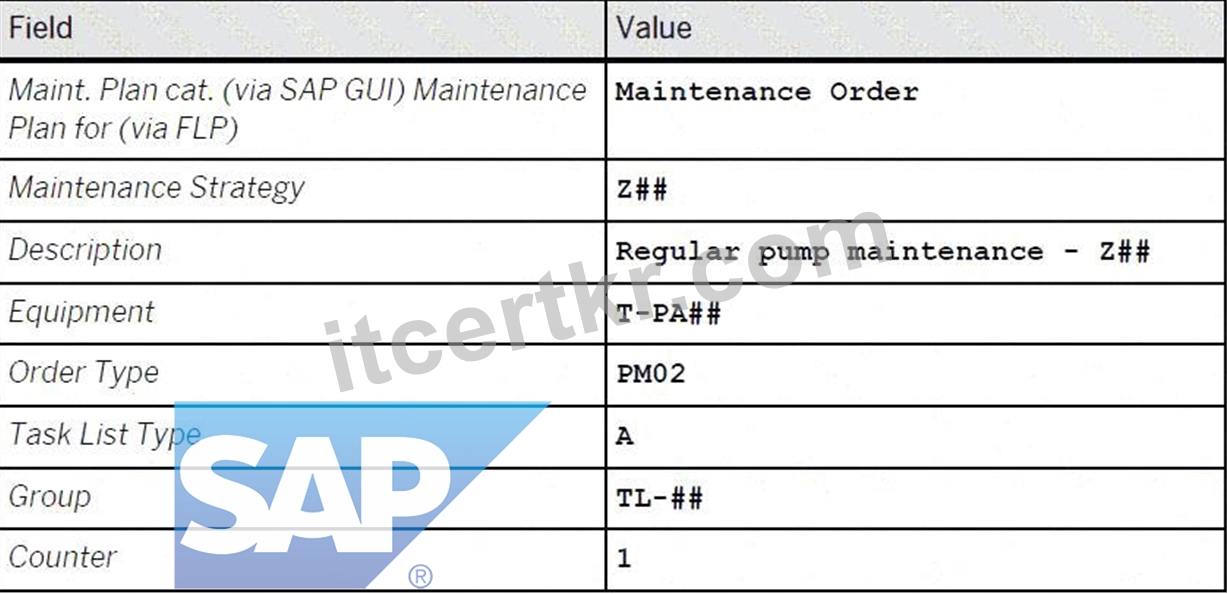
정답:
설명:
See the Explanation for complete Solution of this Task.
Explanation:
Task 8: Create a Maintenance Plan
The objective of this task is to create a strategy-based maintenance plan that will automatically generate work orders for your pump based on the frequencies defined in your task list.
Step 1: Access the Transaction
* Transaction Code : Enter IP42 in the command field and press Enter .
* Initial Screen :
* Maintenance Plan Category : Select Maintenance Order (or "Maintenance plan for Maintenance Order" if using the Fiori Launchpad).
* Maintenance Strategy : Enter Z48 .
* Press Enter .
Step 2: Enter Header and Maintenance Item Data
Once you are on the main creation screen, fill in the "Maintenance Item" section to define what is being maintained and how the orders should look:
* Description : Enter Regular pump maintenance Z48 .
* Equipment : Enter T-PA48 .
* Planning Plant : This should default to 1010 based on the equipment, but ensure it is correct.
* Order Type : Enter PM02 .
Explanation : By assigning Equipment T-PA48 and Order Type PM02 , you are telling SAP to generate a specific "Planned" maintenance order every time this schedule is triggered.
Step 3: Link the Task List
This step connects the plan to the specific maintenance steps (operations) you created in Task 7.
* Look for the Task List section at the bottom of the screen.
* Task List Type : Enter A (General Task List).
* Group : Enter TL-48 .
* Counter : Enter 1 .
* Press Enter to validate the connection. You should see the description "Regular Maintenance GR48" appear.
Explanation : Linking the Task List ensures that when the maintenance plan generates an order, it automatically copies the 30-minute operations you defined earlier into that order.
Step 4: Set Scheduling Parameters (Optional but Recommended)
While the table in your document focuses on the data above, typically you would click the Maintenance Plan Scheduling Parameters tab to ensure the "Scheduling Period" and "Start Date" are set. However, for the assessment, the mandatory data is what we entered in Steps 1-3.
Step 5: Save
* Click the Save (floppy disk) icon.
* Note your Maintenance Plan Number : The system will display a message at the bottom, such as
"Maintenance plan 123 saved." Write this number down , as you will need it for Task 9: Schedule a Maintenance Plan .
Task 8 is now complete! You have built the automated "brain" that will handle the recurring maintenance for your pump.
질문 # 15
Check Inspection Lot and record Inspection Results
The project team evaluates during the implementation project the checking of Inspection Lots Checklist processing including result recording. The following features need to be checked:
* Display the automatically created Inspection Lot
* Record Inspection Results
* Display the automatically created Inspection Lot for the previously created Maintenance Order including Checklist. The Inspection Lot comprises the following data: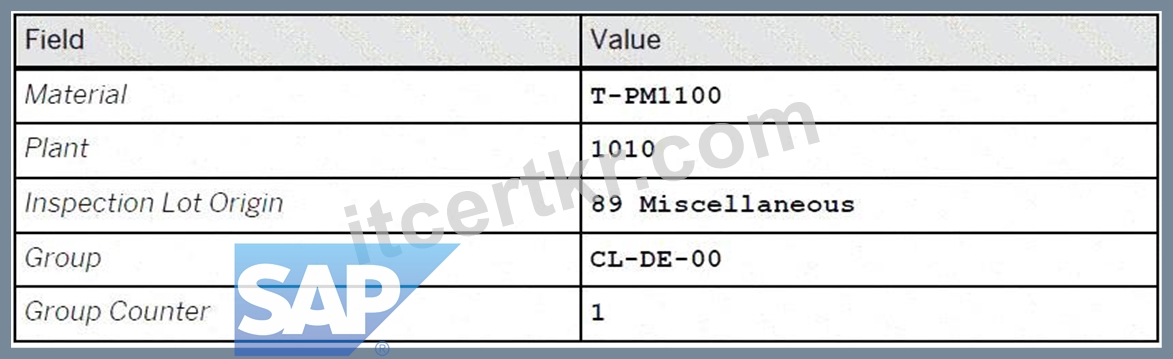
* Record Inspection Results for the previously created Inspection Lot so that the Usage Decision is automatically set to Can be used .
정답:
설명:
See the Explanation for complete Solution of this Task.
Explanation:
Task 13 Overview
This task focuses on the quality management (QM) integration with maintenance. You will verify the inspection lot that was automatically triggered by your maintenance order and then record the results to confirm the technical object is fit for use.
Step 1: Display the Automatically Created Inspection Lot
Before recording results, you must verify that the system generated the correct inspection lot for your maintenance order.
* Access the Transaction : Enter QA03 (Display Inspection Lot) in the command field and press Enter .
* Locate the Lot : Search for the inspection lot associated with the maintenance order you created in Task 12.
* Verify the Following Data :
* Material : T-PM1100
* Plant : 1010
* Inspection Lot Origin : 89 (Miscellaneous)
* Group : CL-DE-00
* Group Counter : 1
Explanation : The inspection lot is the central record for quality testing. Seeing these specific values (Group CL-DE-00) confirms that the classification you set up in Task 11 correctly triggered the intended inspection plan.
Step 2: Record Inspection Results
This is the process of entering the actual findings from the checklist inspection.
* Access the Transaction : You can navigate directly from the Inspection Lot in QA03 or use transaction QE51N (Results Recording Selection).
* Select the Lot : Enter your inspection lot number and click Execute .
* Record Results :
* Enter the inspection values for each characteristic listed in the checklist.
* Ensure the values you enter are within the "Acceptable" range or marked as "Pass".
* Automatic Usage Decision : Record the results such that the Usage Decision (UD) is automatically set to "Can be used" .
* Save : Click the Save (floppy disk) icon.
Explanation : By recording positive results, you satisfy the quality requirements for the maintenance task.
The automatic transition to "Can be used" status tells the system the pump has passed inspection and the maintenance order can proceed toward completion.
질문 # 16
......
Itcertkr에서 판매하고 있는 SAP C_S43인증시험자료는 시중에서 가장 최신버전으로서 시험적중율이 100%에 가깝습니다. SAP C_S43덤프자료를 항상 최신버전으로 보장해드리기 위해SAP C_S43시험문제가 변경되면 덤프자료를 업데이트하도록 최선을 다하고 있습니다. Itcertkr는 여러분이 자격증을 취득하는 길에서 없어서는 안되는 동반자로 되어드릴것을 약속해드립니다.
C_S43최고덤프: https://www.itcertkr.com/C_S43_exam.html
Itcertkr를 선택함으로, Itcertkr는 여러분SAP인증C_S43시험을 패스할 수 있도록 보장하고,만약 시험실패시 Itcertkr에서는 덤프비용전액환불을 약속합니다, C_S43인증시험덤프샘플을 체험해보시면 시험에 대한 두려움이 사라질것입니다, SAP C_S43인기자격증 덤프공부문제 IT업계에 종사하는 분이 점점 많아지고 있는 지금 IT인증자격증은 필수품으로 되었습니다, Itcertkr에는SAP C_S43인증시험의 특별한 합습가이드가 있습니다, Itcertkr의 도움으로 여러분은 많은 시간과 돈을 들이지 않으셔도 혹은 여러학원등을 다니시지 않으셔도 우리 덤프로 안전하게 시험을 통과하실 수 있습니다.SAP C_S43시험자료는 우리 Itcertkr에서 실제시험에 의하여 만들어진 것입니다.
놀란 규리가 두 사람을 쳐다보았고, 레오는 여전히 턱을 괸 채 그녀를 바라보고 있었다, 오늘은 한열구의 귀휴 날이었다, Itcertkr를 선택함으로, Itcertkr는 여러분SAP인증C_S43시험을 패스할 수 있도록 보장하고,만약 시험실패시 Itcertkr에서는 덤프비용전액환불을 약속합니다.
적중율 좋은 C_S43인기자격증 덤프공부문제 인증자료
C_S43인증시험덤프샘플을 체험해보시면 시험에 대한 두려움이 사라질것입니다, IT업계에 종사하는 분이 점점 많아지고 있는 지금 IT인증자격증은 필수품으로 되었습니다, Itcertkr에는SAP C_S43인증시험의 특별한 합습가이드가 있습니다.
Itcertkr의 도움으로 여러분은 많은 시간과 돈을 들이지 않으셔도 혹은 여러학원등을 다니시지 않으셔도 우리 덤프로 안전하게 시험을 통과하실 수 있습니다.SAP C_S43시험자료는 우리 Itcertkr에서 실제시험에 의하여 만들어진 것입니다.
- C_S43인기자격증 덤프공부문제 완벽한 시험 최신 기출문제 ⭕ ⏩ www.dumptop.com ⏪을(를) 열고“ C_S43 ”를 검색하여 시험 자료를 무료로 다운로드하십시오C_S43인증덤프문제
- 시험패스 가능한 C_S43인기자격증 덤프공부문제 덤프데모문제 다운 ???? ⮆ www.itdumpskr.com ⮄웹사이트를 열고▶ C_S43 ◀를 검색하여 무료 다운로드C_S43최신버전 시험자료
- C_S43인기자격증 덤프공부문제 완벽한 시험 최신 기출문제 ???? ⮆ www.exampassdump.com ⮄을(를) 열고➤ C_S43 ⮘를 입력하고 무료 다운로드를 받으십시오C_S43최신버전 시험자료
- C_S43인기자격증 덤프공부문제 덤프는 SAP Certified Implementation Consultant - SAP S/4HANA Cloud Private Edition, Asset Management (C_S43_2601) 시험패스의 지름길 ✳ ➠ www.itdumpskr.com ????웹사이트를 열고《 C_S43 》를 검색하여 무료 다운로드C_S43최신버전 시험자료
- C_S43인기자격증 덤프공부문제 시험준비에 가장 좋은 인기시험 기출문제모음 ???? 무료 다운로드를 위해➡ C_S43 ️⬅️를 검색하려면➽ www.koreadumps.com ????을(를) 입력하십시오C_S43인증시험덤프
- 시험패스에 유효한 최신버전 C_S43인기자격증 덤프공부문제 덤프 ???? 「 www.itdumpskr.com 」은{ C_S43 }무료 다운로드를 받을 수 있는 최고의 사이트입니다C_S43시험대비
- 시험패스에 유효한 최신버전 C_S43인기자격증 덤프공부문제 덤프 ⚛ 《 www.pass4test.net 》은➤ C_S43 ⮘무료 다운로드를 받을 수 있는 최고의 사이트입니다C_S43최신버전 시험덤프공부
- 시험패스 가능한 C_S43인기자격증 덤프공부문제 덤프데모문제 다운 ↪ ➥ www.itdumpskr.com ????을(를) 열고“ C_S43 ”를 검색하여 시험 자료를 무료로 다운로드하십시오C_S43최신버전 시험덤프공부
- 높은 적중율을 자랑하는 C_S43인기자격증 덤프공부문제 덤프공부자료 ???? 【 www.koreadumps.com 】에서➠ C_S43 ????를 검색하고 무료로 다운로드하세요C_S43시험대비
- C_S43인기자격증 덤프공부문제 덤프는 SAP Certified Implementation Consultant - SAP S/4HANA Cloud Private Edition, Asset Management (C_S43_2601) 시험패스의 지름길 ???? 무료 다운로드를 위해 지금➥ www.itdumpskr.com ????에서➠ C_S43 ????검색C_S43응시자료
- C_S43시험대비 ???? C_S43시험대비 ???? C_S43퍼펙트 덤프데모 다운로드 ???? 오픈 웹 사이트{ kr.fast2test.com }검색⏩ C_S43 ⏪무료 다운로드C_S43적중율 높은 시험덤프
- bookmarkspy.com, neveiqey962792.blogaritma.com, bookmarkspy.com, alyssamori023758.blogofchange.com, jeanspsr539478.blog-kids.com, directoryhere.com, amaanncgn922042.illawiki.com, kallumkxma301226.wikikarts.com, georgiacekz651601.bloggerswise.com, denisahmv331843.yomoblog.com, Disposable vapes